It's the end of July, and some teachers may be ready to start setting up their classroom and utilizing all of the wonderful materials they read and skills and tips learned in trainings attended all summer. Others, like me, may be in a panic thinking that I slacked off and only read one script and didn't update any unit plans nor did I continue reading and planning after attending an awesome training. One of my flaws as a teacher is that I am constantly comparing myself to others.
I had a fellow colleague my first few years of teaching who always made me feel like I wasn't doing enough for my students. This feeling has never left me. When I leave at 5:30 pm when my students do, am I doing enough? When I don't add extra trips and parties, am I doing enough? When I step back, I can clearly see that I am doing more than enough for these kids. Our performances and contest results validate that for me several times throughout the year. But, I still have this feeling in the back of my mind that I'm just not working hard enough.
Ten hour days and spending my own time and money shopping for supplies for plays is most definitely enough. Planning field trips and parties is definitely enough. The fact is: every teacher has their own style, and their own method of doing the work they need to do in order to achieve their individual goals. As teachers, we need to stop judging other teachers for what we see them do, or don't do. We need to support one another even more now than ever. So, when your colleague leaves at the end of contract time while you're still working, don't judge. When your colleague stays until 7 every night, don't judge. How about we all work towards asking one another for help or offering it? I admit, I have a hard time asking for help, but I really appreciate it when someone does so.
I promise to work harder for my students AND my colleagues this year.
Let's get ready for another school year! (Or take more time to relax before getting ready!)
Whatever sprinkles your doughnut!
Cheers,
Kasey
Showing posts with label teaching. Show all posts
Showing posts with label teaching. Show all posts
Monday, July 23, 2018
Friday, March 3, 2017
How to Run a Drama Club (When You Already Have a Full Plate)
Finally, an update. I have had ideas for my blog all year, but it hasn't been a priority compared to other things I have going on. Veteran teachers, you know what I'm talking about. First year teachers, you may feel like you are barely swimming, but keep going! We are one week away from spring break, and almost at testing season. Once that's over, the pressure is off and we can relax and enjoy our time with our students.
How many of you are usually the last car in the parking lot, walking out when the sun is going down or already down? We don't have windows in our classrooms or auditoriums, and we don't see the sun when we leave, either. Don't let the lack of vitamin D get you down! Remember the tips from the previous entry about survival. We can do this!
My campus is always looking for ways to get disenfranchised students involved, even though we have a great fine arts program where many students are already involved. How can you get more students interested in drama? Have an official Drama Club! Some teachers use an official honor society, which is great for your dedicated kids who come to every audition. I'm talking about involving those kids that are flat out afraid to audition, or they can't commit to staying after school every day. Yeah, those kids. Here is what I require of my Drama Club:
1. Every September club members submit permission slips and membership dues for the entire year. Many districts require paperwork and a procedure for collecting money, and collecting dues up front saves time before events throughout the year. This year I charged $20.
2. Benefits of joining Drama Club: t-shirt, field trip to see a play, Christmas movie party, and Mystery Dinner party at the end of the year. At the first meeting, members design and vote on the year's t-shirt, and vote for officers.
3. Students vote on what Christmas movie to watch for the party and what play they want to go see.
4. Before the field trip, I collect a $5 fee to ensure that students will follow through and show up. Every year I have students who submit their permission slips for the play, I buy tickets, and they don't show. It also helps pay for those unused tickets or a bus if you need one.
5. I use www.nightofmystery.com for our Mystery Dinner Parties. I teach 6-8th grades, so I can use the same parties on a three year rotation. I like to play along, but this will be my fourth year doing them so I know the killer now. :) I cater in Zio's, they get character information in their invitation, and we have a blast. It's like a banquet, but more fun!
6. We hold one monthly meeting where we discuss the next upcoming event. I would love to include a service project, but with all the contests we have going on, I am finding a hard time to plan and execute one. Maybe something as simple as picking up trash along the roads to school. Still in the works!
I hope this helps you generate ideas to get more students involved in theatre. I have 60 kids in the Drama Club, and not all come to auditions for plays. They get to be a part of theatre without testing their fear of performance.
I'm hoping to add more to the blog and more to my store over spring break and in May! :)
Cheers!
Thursday, August 18, 2016
Non-teaching Tips for First Year Theatre Teachers

Congratulations! You got the job! Your dream job! You've been through new teacher orientation, staff development on your campus, and met a ton of new people. Your students will be walking through those doors in just a few days. You've been trained on teaching techniques, and behavior techniques. Your passion for theatre runs in your veins. You're so ready!
Returning teachers: finish your fruity, frozen drink, put away the swimsuit and floaties, and try to find your school ID badge. It's time to inspire a new group of shiny students! These tips could work for us returners, too. As I was drafting this post, I realized that these tips are good reminders for myself, as well. We know that the day-to-day can be really hectic with all that we do. It's good to step back and take it all in, and take care of ourselves.
The following are tips for new (and old!) teachers that have nothing to do with instruction, because let's face it: instruction only covers a percentage of what we do every day.
1. Buy a large, long-lasting water bottle. I have a 32 oz bottle that I refill throughout my day. Staying hydrated helps fight fatigue, headaches, and the grumps.
2. Train yourself to use the bathroom once a day. I'm not kidding. Last year, I had a morning conference, so between 11:20 and 5:30 I had to sprint to the bathroom if I had to go. Those teacher memes about the bathroom are not jokes. They are true.
3. Make sure you have a microwave and refrigerator near your room/black box/office/auditorium. Lunch is precious, precious time and you don't want to waste it walking across campus to the lunch room.
4. On that note: bring a lunch and sit down and eat it. I mean it! Preferably with other adults with whom you can engage in an adult conversation with. Fellow middle school teachers: trust me on this. You need a break from adolescents in your day, no matter how much you may enjoy them. (Confession: sometimes I don't have food to bring, or I didn't have time to pack a lunch, so I get a tray in the cafeteria. Some schools have a great lunch program; others do not. Investigate first before it's too late!) Also, keep plastic silverware, plates, and paper towels in your office.
5. Don't wear your school shirt to happy hour on Fridays.
6. Keep healthy snacks in your office/desk. Our days are long, and lunch times vary. Our last lunch doesn't start until 12:20. I would DIE if I had to wait that long between breakfast and lunch. (for some reason I can make it from 11:30am-8pm with rehearsal and a workout before I get hungry. Go figure.)
7. Have instant coffee/a Keurig/tea. I think scientific studies have been done that indicate humans need a siesta in the afternoon. That's why it's the "afternoon slump". Mine always hit during 6th period, with three classes, rehearsal, and a workout to go. Caffeine in any amount is very helpful.
8. Attend as many meetings on campus as you can. Be visable. Work with other teachers on campus. Don't hide away and be forgotten. Attend staff parties and happy hours. Do Secret Santa at least one year. Treat the office staff like queens (or kings), give treats to your custodians. Participate in a pep rally. Do the "non-theatre" fun stuff on your campus. You are not an island; you are a part of a community.
9. SLEEP. I confess that this is something I struggle with during the school year, and I LOVE sleeping. I slept a lot this summer and I don't regret it. My body needed it. I'm pretty sure that I read somewhere sleep studies have shown that you can't "store" up sleep that you missed, but man it sure feels good! One of my goals this year is to go to bed at a certain hour (especially during my peak running training). It's so hard to multitask and not be grumpy when your body is lacking sleep. Lack of sleep also leads to missed workouts and bad food choices, which leads me to...
10. Make healthy food choices. I'm not saying you should do a Whole 30 or even count calories. Eat more fruit instead of processed food. Avoid fast food on those evenings when you are just bone tired. Mental exhaustion feels like physical exhaustion, but you can still muster up the energy to eat better to keep your body functioning the way it should. Without that, how can you be there for your students? Along those lines, schools and teacher's lounges are filled with junkie goodies. For example, the first day of training we had candy scattered on our tables. Tomorrow, the PTA is providing donuts. (YUM! You know I'm going to eat one, but the key here is ONE.) It's ok to say no to free junk food.
The bottom line is: Take care of yourself. We give so much to our students (it's THE reason why we go to work every day). It's so easy to forget about taking care of yourself in this profession. But, if we teachers don't take care of ourselves, how can we be at our best for our students? Veteran teachers, I hope this was a helpful reminder for you, as well.
We have such an important job. Do little things to make sure you are the best that you can be every day, from August to June!
It kind of feels like Christmas, doesn't it? New school supplies, new clothes, new scripts, new faces. Drink some night time tea and get to bed early, and have a GREAT school year!
Cheers,
Kasey
Tuesday, October 20, 2015
Middle School Theatre: Why I Love Google Drive
There is nothing more exciting than finding a tool that I can share with my students that actually works! I find that Google Drive has been amazing for keeping up with all that I do at work (and personally), and my students can easily use this tool.

How I Use Google Drive in My Theatre Classroom
Most kids (and parents!) question why we have to write in theatre. Not only is drama a genre of literature, but performance is the analysis and study of writing and the human condition. When it comes to getting middle school students to write in an elective, it's important to start out small and work your way up. I start with daily warm ups, short monologues, and short scenes. My advanced class by far does the most writing. I teach them modern oratory as we prepare for our speech contest. I would only do this unit for this class as they are competition-driven and want to be in the class.
Modern oratory, for those that don't know, is a 3-6 minute long speech written by the student about one of the given UIL topics. Students must define the problem, determine the pro and con issues, research the issue, look at both sides of an issue, reach a conclusion, and support that conclusion with documentation.
This means we will need methods of finding such research. That's where technology comes into play. My school has a few carts with Chromebooks, so I checked out one for a week and a few days. I gave the students a few days to research their topic online, copy and paste their articles into a Google Doc in a shared folder, then discuss their research with students who chose the same topic.

First, I created a folder just for Advanced Theatre Arts. Then I shared this folder with every student in the class. Then I created a folder for each unit so it would be organized.

Students submitted their research through Google Classroom, and typed their speech on a document in the shared folder. This way I was able to see them working on it live, see if they worked on it at home, and give them live suggestions as they wrote.


Google has definitely been a time saver for this busy theatre director and has made life easier for both me and my students. I encourage you to play around with this fabulous tool if your district has not implemented it yet. My students also use Google Slides and other apps when we use iPads for presentations of information.
I love new technology and finding ways to make teaching and learning easier!
Happy Googling!
Kasey
Students submitted their research through Google Classroom, and typed their speech on a document in the shared folder. This way I was able to see them working on it live, see if they worked on it at home, and give them live suggestions as they wrote.

I love this feature about Google Docs the most! I can keep my students accountable and give them instant feedback. Throughout class I would hear students say, "I see you on my speech, Ms. Korth!" and it would motivate them to work. Or, "Thanks for the suggestion!" It saved me time, as well, from having to print and read all 18 of their papers and make corrections by hand after school. I read them and made corrections as they worked.
I could also print them from my computer, which is already tied to the printer, when I felt they were ready. We only needed to print the final draft so they could annotate and memorize for the performance. Google absolutely made this project so much smoother than hand-writing, and my kids who have a tougher time writing found it an easy mode of doing so.
I also love Google for auditions. I have a separate folder for each unit and each production that I do. Instead of printing out an unknown set of copies of the audition forms and contracts, I had students scan a QR code or go to the URL for the Google Form to sign up. I added at the bottom of the contract that students agree to said contract by signing up. All of their info is sent to a spreadsheet so I can number and organize and make notes during auditions, then have that information for students who make the cast. It's such a breeze!

My school has really pushed to have assignments and lessons online, so I have been using Google Classroom since it's password protected. Students must use their school district Google log in to access your classroom (or personal if you have them set up their own accounts). I post all kinds of things, like the link to the Daily Warm Up questions on a Google Slide, or screen caps of their interactive notebook lesson for the day, and especially make up assignments if they miss a performance or day.

I love new technology and finding ways to make teaching and learning easier!
Happy Googling!
Kasey
Wednesday, September 9, 2015
Middle School Theatre Arts: Grading Made Easy!
I realize that my last post about Theatrefolk podcasts seems a bit rushed. It was very rushed; I tried to blog on my conference. HA! I tried to be productive on my conference; imagine that. I've decided if I'm going to write a coherent and helpful post I should wait until I'm not at school. Also, we've started our musical (Legally Blonde, Jr.!) so I'm hoping my posts won't disappear. No promises.
I had an interactive notebook quiz last week with all seven of my classes. In the past, they were quizzed over their warm ups and it was a disaster. I would ask what the entry was for four different dates and they would be writing the entire period and many failed because, let's face it, middle school students do not do warm ups. My school loves them, and I do, too, because they help to focus the kids and give them a task to do before and after the tardy bell so I can deal with issues before we start each class. Anyway... I don't want my kids to fail and putting so much weight on a warm up was not efficient. Instead, I am quizzing them on their interactive notebook. It's an open-notes quiz, and multiple choice. Instead of writing the entire period, they fill in a bubble on an answer document. Instead of spending too much time grading, I hold the answer document up to the camera on my laptop and it grades it for me! How, you ask?
GradeCam.
This little website is amazing! First you must create an account. I always use my school information when creating an account, that way I will always know it.
When you log in, your dashboard looks like this:

You must add all of your students. This seems daunting, but many gradebooks have an export feature. My district uses GradeSpeed and this link is on the left. You must click this link for each period and section you teach. It will automatically go to your Downloads folder.
In GradeCam, click on Classes and add a new one. Import your students through the file you created and hit next until they are all there. Do this for every class. It seems tedious, but it's worth it.
Once all of your classes are made, create an assignment. Make sure you create a key that is accurate!
To print forms for students, click on Forms. There are different options for the choices and such. I printed four copies, then cut and taped them to one paper and made several copies from there and use a paper cutter to cut them. Saves paper.

When students take the quiz or assignment, they must bubble in their GradeCam ID, which is the same as the last four digits of their ID that was imported with your roster. TIP: have them also write their name on the top. We know them by name, not numbers. So much easier when handing back.
Students can use pencil or pen. When you're ready to grade, click on the assignment and correct class period, and hold the answer document up to the camera until it makes a little noise. Viola! Graded! When I enter them into my district gradebook, I make each browser small and put them next to each other and just enter the grades. BAM! They are done in a few minutes! I cannot express how much time and paper and stress this little tool has saved me and it's only been one quiz!
For absent students, I place the class set of the questions with extra answer documents in a labeled folder in the dish rack I have next to the bookshelf. When a student presents me with an excused slip and asks what they missed, I can easily give them the documents and they can take the quiz in the hall. I can grade it in seconds and the grade is saved online to enter in later.
This can be used for quizzes, tests, take home assignments, etc.
We all need more time, and GradeCam gives us a bit more in our busy educator lives.
Cheers!
Thursday, August 20, 2015
How I Set Up My Middle School Theatre Classroom
I'm beginning my fourth year of teaching this year and finding that I am adding and improving things every year. It can only get better, I think!
 I also have a storage closet and small office. The computer hook up for the sound system and projector is in the classroom, so I also have a desk outside of the office. I find that I don't really spend time in the office. (Only to cry, which hasn't happened in the last year!) Inspend most of my time in the classroom space.


I am almost ready for my students; just a few things to add or clean. Ignore my desk; it's a dumping ground right now.
I am lucky to have a great black box for my teaching and learning space. I have 5 beginning classes, one intermediate, and one advanced class.
I have a word wall near the door with large word. These are words that we use frequently or or frequently misspelled.
My students loved to write their birthday all over my dey erase events calendar and it got out of hand last year. I have a separate space for them to show everyone when their birthday is. The cabinets have interp pieces and lesson plans, as well as "Indepndent Theatre" assignments. This is book work for kids who missed a performance or go to ISS or AMS. I copy these at the beginning of the year and pull them as needed. The book shelf is organized for students to check out materials with the iPad on a a Google form, and my CHAMPS posters are displayed. I rarely had to refer to them last year, which was great. I am storing interactive notebooks in the colored bins, and the turquoise bins are for papers that need to be handed back or scripts left behind. I really want a bright fuzzy rung over here, but I have to see ify students can handle it.
I have a place to turn in papers, class rules, rewards and consequences, and a dry erase calendar. I also have a dish rack that Inise for the unit's assignments for absent students and a place for found pencils to go.
I have to keep the stage curtains behind the objectives board because idle school kids will not resist the temptation to play with them otherwise. The table has five student laptops and bins for interactive notebook supplies. The bins are numbered for each table, which has a number. I always have assigned seats at the beginning of the year to establish structure and usually stop using them depending on class behavior. Don't forget a giant lost and found bin! I find my theatre kids are always leaving stuff behind.
Near my office I display information about our district speech contests and NSDA points and certificates up on the ledge.
It's taken me four years to get to this point and each year I add or change something so I can be more efficient and teach my students more effectively.
We will be starting interactive notebooks next week so I will update on the process when we get there.
Good luck to all educators out there was you prepare for another year of shaping and molding the minds of the future generation! Take care of yourselves, as well as your students.
Friday, February 6, 2015
Interactive Notebook Ideas for Middle School Theatre Arts
I'm in my third year of teaching middle school theatre and finally feeling like I'm not constantly drowning. I've had my students complete a bell-ringer/warm up assignment in a notebook for the last two and half years so they can learn concepts and focus on theatre while I take care of housekeeping tasks and learning is still happening. I've decided my goal for next year is to implement interactive notebooks in my classroom and change the formatting of my bell-ringers.
Interactive notebooks are not new to me; I saw them in use by the wonderful elementary teachers I worked with as a special ed assistant. I recently took a workshop at TETA Theatrefest about the notebooks, which sparked my interest. I love colors and note-taking, but I also see how some kids don't like this. I, however, feel it would be a great way for them to learn concepts and complete assignments without loose-leaf paper. It can be something they are proud of with drawings, colors, and stickers.
I kept the notebook I received at the TETA workshop and I started creating sample lessons for middle school theatre at all levels. Below are some of the ideas I've come up with:
 Here's the cover. I know; it's simple. The workshop instructor made a good point when she said glued on images fray and fall off through the year. A simple cover with the student's name and class period works. These notebooks should be kept in the classroom, sorted by period.
 These two pages showcase a lesson about how our bi-annual speech tournaments work in my district. I used foldables and sticky notes to have students understand how sectioning works and which events to pick. I always have them create a goal they want to achieve so they can focus on that as they prepare for the tournament.
 This is a Theatre I lesson on stage directions. Have them paste in the grid and fill it out as a class. You could use stickies and foldables, as well.
 The above photo is a section about the UIL one act play unit set pieces. I teach in Texas, and UIL one act play contest = life! My job at the middle school level is to teach them the basics and give them experience with the contest before they go to high school. Our district contest is competitive and so much fun at the middle school level.
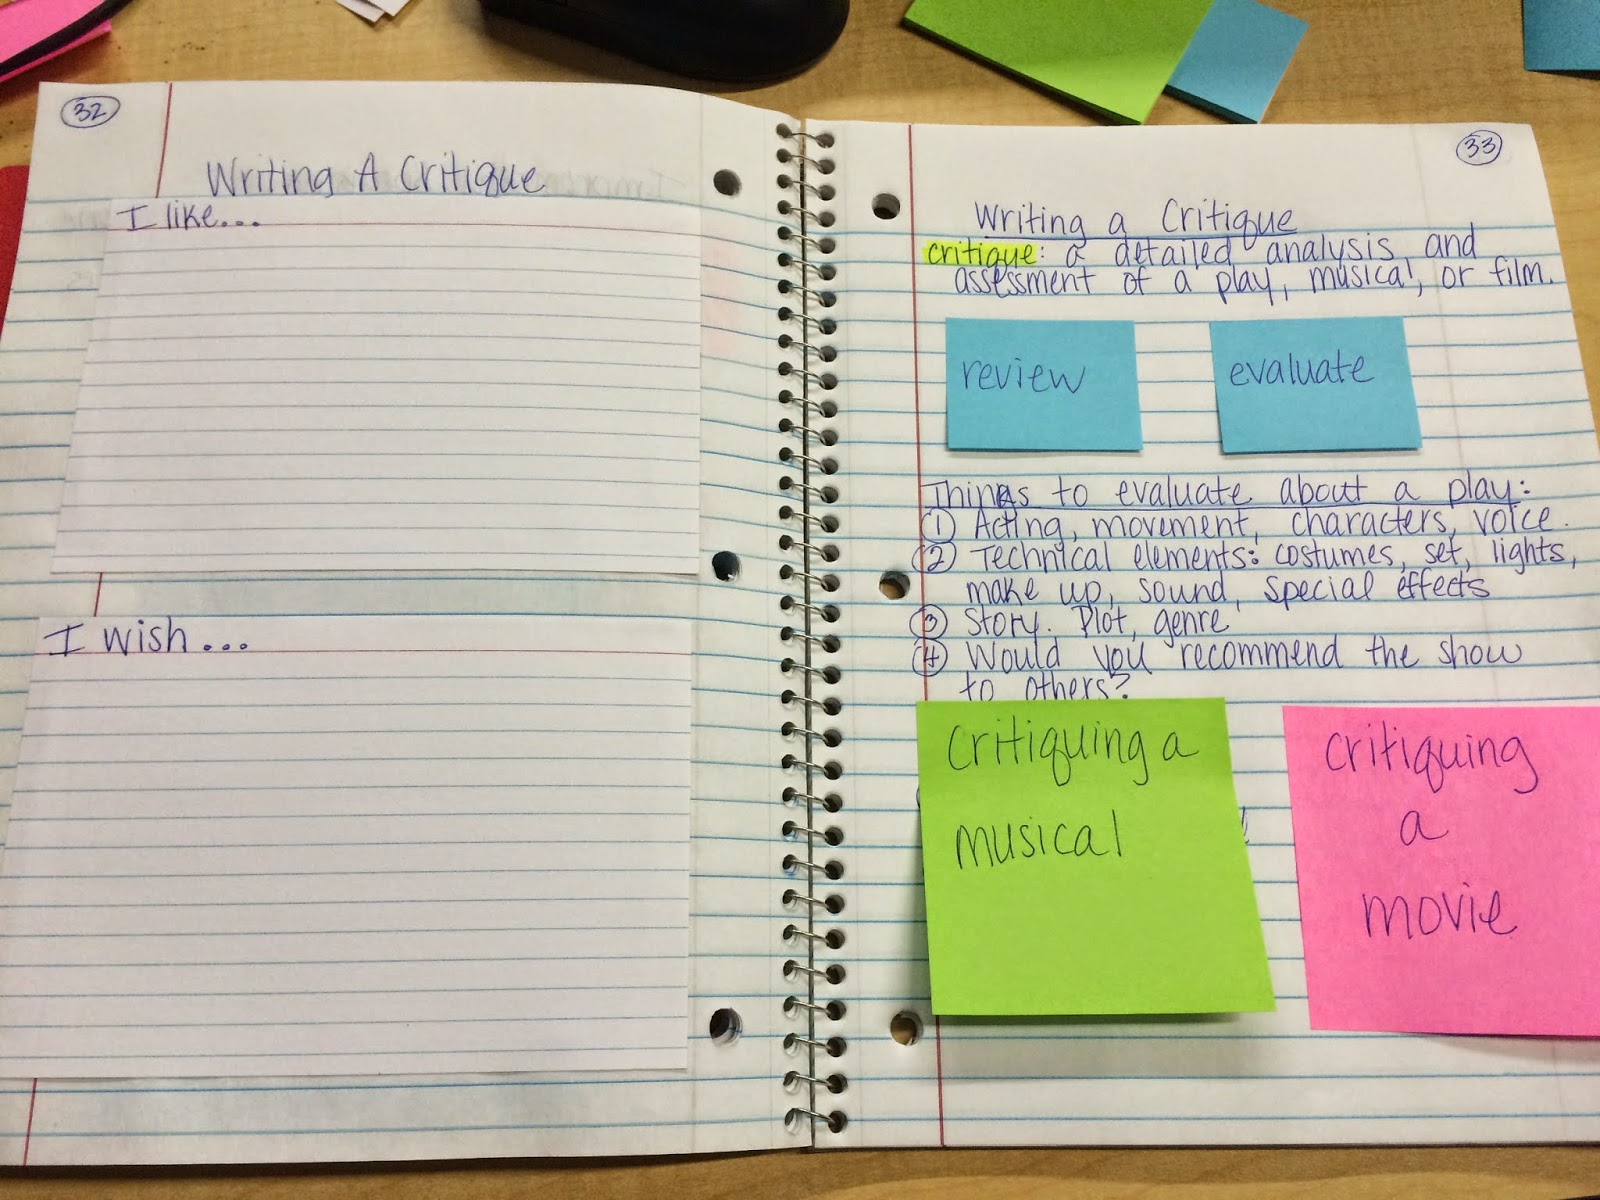 This is a lesson teaching the critique process for theatre, musicals, and film. Later in the notebook I can have them write a page-long, paragraph form critique based on this lesson.
.JPG) Envelopes are a fun idea! Students can keep show tickets in one throughout the year, and in this improv lesson they can keep character idea cards for when we play improv games. I also includes foldables for CROW and the Four Rules (Tina Fey!) of improv.
Envelopes are a fun idea! Students can keep show tickets in one throughout the year, and in this improv lesson they can keep character idea cards for when we play improv games. I also includes foldables for CROW and the Four Rules (Tina Fey!) of improv.
You can also use foldables for Character Analysis, External/Internal Characteristics, The Rehearsal Process, playwrights, careers, vocabulary, etc.
I know several teachers on my campus deal with warm ups and bell-rings differently. Some flip the notebook over and have them record the warm ups in the notebook that way. I've created a weekly template to use next year. They will keep it in their binder and turn it in every Friday. When it's graded they can cut out the warm up template and glue it on the next clean page in their notebook for reference. Open notes quizzes can be given.
I've seen the idea of sawing composition books in half for smaller notebooks, and I think I will do that for rehearsal notebooks for my after school shows. They are small enough to keep with their scripts and they don't need a ton of space for their individual notes.
Bookmarks can be added with tape and a ribbon on the back cover.
The possibilities are endless with interactive notebooks. There are plenty of free resources online, especially Pinterest.
Happy notebooking!
Kasey
Interactive notebooks are not new to me; I saw them in use by the wonderful elementary teachers I worked with as a special ed assistant. I recently took a workshop at TETA Theatrefest about the notebooks, which sparked my interest. I love colors and note-taking, but I also see how some kids don't like this. I, however, feel it would be a great way for them to learn concepts and complete assignments without loose-leaf paper. It can be something they are proud of with drawings, colors, and stickers.
I kept the notebook I received at the TETA workshop and I started creating sample lessons for middle school theatre at all levels. Below are some of the ideas I've come up with:
I know several teachers on my campus deal with warm ups and bell-rings differently. Some flip the notebook over and have them record the warm ups in the notebook that way. I've created a weekly template to use next year. They will keep it in their binder and turn it in every Friday. When it's graded they can cut out the warm up template and glue it on the next clean page in their notebook for reference. Open notes quizzes can be given.
I've seen the idea of sawing composition books in half for smaller notebooks, and I think I will do that for rehearsal notebooks for my after school shows. They are small enough to keep with their scripts and they don't need a ton of space for their individual notes.
Bookmarks can be added with tape and a ribbon on the back cover.
The possibilities are endless with interactive notebooks. There are plenty of free resources online, especially Pinterest.
Happy notebooking!
Kasey
Tuesday, July 29, 2014
Create Your Own Lesson Plan Book
I've been teaching Theatre Arts at the middle school level for two years now. I also have a hard time finding a lesson plan book that is cute and functional for me. I find that all the "cute" ones are structured for elementary, and the one that had the best layout for me was brown. That does not accurately represent at Theatre Arts teacher, in my opinion. Instead of spending over $50 on an Erin Condren planner that is beautiful but not completely useful for me, I decided to make my own.

What you will need:
Before I printed a signal page, I spent a good afternoon working on my documents in MS Word. I first created my very own weekly lesson plan 2-page spread. I created a row for each class. I teach four different sections, so four rows across. I included a space for TEKS (Texas Essential Knowledge and Skills), Objective/Activity, and Assessment for each day. I knew I wanted the week to be on a 2-page spread so I could have room to write and it could lay flat on my desk. I also had room to type the TEKS strands right on the page, as well as room for after school activities and school events for that week.

I printed enough for the entire school year. You have to babysit the printer and feed the pages in so they print on both sides. (make sure you leave room on your document for binding in the center).
The next thing I tackled was getting a calendar in the book. I always get a great 2-page spread academic calendar from my fundraising company, but it wouldn't work with the binding in this book. So, I scoured the internet for the perfect calendar template and I found one! Check it out here. This calendar is an Excel file and you can customize for any month, year, font, and type in your dates you already know.

Again, you need to babysit the printer and tell Excel to print one page at a time so you get the correct pages on both sides. This was the most tedious part. (Sometimes my printer printed the wrong thing, or it ran out of ink the middle of a job on the nice paper...)
I also included things I found I used and frequently misplaced in the pile of stuff on my desk. I made a detention record. I don't assign lunch detention very often, and when I do I usually forget. So, now I have two pages to record who's going to show up and when, and if they didn't show at all.

Next I created a page for me to record Staff Development/Teacher Choice Hours and my absences for the year. I put this on the back page of my calendar section, and the following page is curriculum at a glance for all four sections.

The last section is 14 pages of blank class rosters. I used to print them out and have them on clipboard for performances, presentations, and daily grades. Then I would lose the clipboard. Now they are in this book!
The cover is something I found on Pinterest, of course. You can find the covers (and more!) that I used at Teachers Pay Teachers for free!


For the finishing touches, I took my carefully printed and organized stack of papers to FedEx/Kinkos. I had never used their laminating machine and thought it was thin like the one I use at school so I had them copy my covers on cardstock. When I used the laminating machine, I realized that the cardstock wasn't necessary. After laminating the front and back covers, I had them bind it with a coil binding. They didn't have white, which I preferred, but black is just fine. It cost $5 for the binding and $2 for lamination.
To recap, here's a Table of Contents of what I included in my personal planner:
Thanks for reading this huge post about my super awesome personal planner! I can't wait to use it and I hope you can use these tips to make one that works best for you. Pinterest is a gold mine for lesson plan templates, calendars, and binder covers. Lots of them are FREE!
Enjoy!
Kasey
What you will need:
- tons of printer paper. I used watermarked paper that I had left over from printing my graduate thesis. Thicker than regular printer paper and looks nicer.
- full ink cartridges. I ran out of ink when I was almost finished. I also used black and white 97% of the time and saved the color for the covers.
- MS Word.
- Pinterest.
- your favorite calendar template
Before I printed a signal page, I spent a good afternoon working on my documents in MS Word. I first created my very own weekly lesson plan 2-page spread. I created a row for each class. I teach four different sections, so four rows across. I included a space for TEKS (Texas Essential Knowledge and Skills), Objective/Activity, and Assessment for each day. I knew I wanted the week to be on a 2-page spread so I could have room to write and it could lay flat on my desk. I also had room to type the TEKS strands right on the page, as well as room for after school activities and school events for that week.
I printed enough for the entire school year. You have to babysit the printer and feed the pages in so they print on both sides. (make sure you leave room on your document for binding in the center).
The next thing I tackled was getting a calendar in the book. I always get a great 2-page spread academic calendar from my fundraising company, but it wouldn't work with the binding in this book. So, I scoured the internet for the perfect calendar template and I found one! Check it out here. This calendar is an Excel file and you can customize for any month, year, font, and type in your dates you already know.
Again, you need to babysit the printer and tell Excel to print one page at a time so you get the correct pages on both sides. This was the most tedious part. (Sometimes my printer printed the wrong thing, or it ran out of ink the middle of a job on the nice paper...)
I also included things I found I used and frequently misplaced in the pile of stuff on my desk. I made a detention record. I don't assign lunch detention very often, and when I do I usually forget. So, now I have two pages to record who's going to show up and when, and if they didn't show at all.
Next I created a page for me to record Staff Development/Teacher Choice Hours and my absences for the year. I put this on the back page of my calendar section, and the following page is curriculum at a glance for all four sections.
The last section is 14 pages of blank class rosters. I used to print them out and have them on clipboard for performances, presentations, and daily grades. Then I would lose the clipboard. Now they are in this book!
The cover is something I found on Pinterest, of course. You can find the covers (and more!) that I used at Teachers Pay Teachers for free!
For the finishing touches, I took my carefully printed and organized stack of papers to FedEx/Kinkos. I had never used their laminating machine and thought it was thin like the one I use at school so I had them copy my covers on cardstock. When I used the laminating machine, I realized that the cardstock wasn't necessary. After laminating the front and back covers, I had them bind it with a coil binding. They didn't have white, which I preferred, but black is just fine. It cost $5 for the binding and $2 for lamination.
To recap, here's a Table of Contents of what I included in my personal planner:
- Cute front cover with district calendar printed on the other side.
- Goals for 2014-2015 (my list of possible plays for the year)
- Monthly calendar (2-page spread) August 2014-August 2015
- Teacher Choice Hours/Absences
- Year-at-a-Glance Curriculum
- Weekly lesson plans
- 2 pages of Detention Records
- Blank Class rosters
- Notes for Next Year
- Back Cover to match the front
Thanks for reading this huge post about my super awesome personal planner! I can't wait to use it and I hope you can use these tips to make one that works best for you. Pinterest is a gold mine for lesson plan templates, calendars, and binder covers. Lots of them are FREE!
Enjoy!
Kasey
Subscribe to:
Posts (Atom)